17장. Batch Processing 과 YOLO 데이터 준비
실습 5 — YOLO 데이터셋 만들기
검사를 통과한 주석만으로 YOLO 데이터셋 out_ch17_yolo/ 를 만듭니다. 고칠 수 있는 실수는 고치고, 사람이 봐야 하는 그림은 뺀 뒤, 그림을 8:2 로 나눠 그림, 라벨, data.yaml 을 씁니다. 마지막으로 라벨을 그림에 그려 확인합니다. 18장에서 이 폴더를 그대로 읽어 YOLO 를 학습시키므로 폴더 이름과 짜임을 바꾸지 않습니다.
1단계. 주석 정리하기
from pathlib import Path
import cv2
import numpy as np
import pandas as pd
import matplotlib.pyplot as plt

plt.rcParams["font.family"] = "Malgun Gothic"
plt.rcParams["axes.unicode_minus"] = False

CLASSES = ["bolt", "nut", "washer"]                    # 클래스 번호: bolt 0, nut 1, washer 2
src = Path("ch17_raw")
ann = pd.read_csv(src / "annotations.csv")
sizes = {p.name: cv2.imread(str(p)).shape[:2] for p in sorted(src.glob("*.png"))}

ann = ann[ann["filename"].isin(sizes)]                 # 그림 없는 주석: 지운다
ann = ann.drop_duplicates()                            # 중복 줄: 하나만 남긴다
# 모르는 클래스가 있는 그림은 통째로 빼서 사람에게 돌려보낸다
recheck = set(ann.loc[~ann["class"].isin(CLASSES), "filename"])
recheck |= set(sizes) - set(ann["filename"])           # 주석 없는 그림도 뺀다

rows, count = [], {"뒤집기": 0, "자르기": 0, "크기 0 지움": 0}
for r in ann.to_dict("records"):
    if r["filename"] in recheck:
        continue
    h, w = sizes[r["filename"]]
    x1, x2 = sorted((r["x1"], r["x2"]))                 # 뒤집힌 상자: 작은 값이 앞으로
    y1, y2 = sorted((r["y1"], r["y2"]))
    count["뒤집기"] += (x1, x2) != (r["x1"], r["x2"]) or (y1, y2) != (r["y1"], r["y2"])
    cx1, cy1, cx2, cy2 = max(x1, 0), max(y1, 0), min(x2, w), min(y2, h)   # 범위 밖: 테두리에 맞춰 자른다
    count["자르기"] += (cx1, cy1, cx2, cy2) != (x1, y1, x2, y2)
    if cx2 - cx1 < 1 or cy2 - cy1 < 1:                 # 크기 0 상자: 지운다
        count["크기 0 지움"] += 1
        continue
    rows.append({"filename": r["filename"], "class": r["class"], "x1": cx1, "y1": cy1, "x2": cx2, "y2": cy2})

clean = pd.DataFrame(rows)
print("고친 것:", count)
print("다시 주석할 그림:", sorted(recheck))
print("남은 그림:", clean["filename"].nunique(), "장 · 남은 물체:", len(clean), "개")고친 것: {'뒤집기': 2, '자르기': 2, '크기 0 지움': 1}
다시 주석할 그림: ['part_014.png', 'part_017.png', 'part_042.png', 'part_051.png']
남은 그림: 56 장 · 남은 물체: 172 개2단계. 8:2 로 나누기
names = sorted(clean["filename"].unique())
rng = np.random.default_rng(1717)                      # 씨앗을 고정해 다시 돌려도 같게 나눈다
order = rng.permutation(len(names))                    # permutation: 0..n-1 을 무작위 차례로
n_train = round(len(names) * 0.8)
split = {names[i]: ("train" if k < n_train else "val") for k, i in enumerate(order)}
clean["split"] = clean["filename"].map(split)

print("그림 수:", pd.Series(split).value_counts().to_dict())
print("물체 수:", clean["split"].value_counts().to_dict())
# crosstab: 두 열을 가로세로로 놓고 개수를 센 표
print(pd.crosstab(clean["class"], clean["split"]))그림 수: {'train': 45, 'val': 11}
물체 수: {'train': 146, 'val': 26}
split train val
class
bolt 41 7
nut 49 10
washer 56 93단계. 폴더, 라벨, data.yaml 쓰기
import shutil

root = Path("out_ch17_yolo")
if root.exists():
    shutil.rmtree(root)                                # 다시 돌릴 때 지난 결과가 섞이지 않게 지우고 새로 만든다
for kind in ("images", "labels"):
    for part in ("train", "val"):
        (root / kind / part).mkdir(parents=True, exist_ok=True)

for name in names:
    part = split[name]
    # shutil.copy2: 파일을 그대로 복사한다. 원본은 ch17_raw 에 그대로 남는다
    shutil.copy2(src / name, root / "images" / part / name)
    h, w = sizes[name]
    lines = []
    for r in clean[clean["filename"] == name].itertuples():
        xc, yc = (r.x1 + r.x2) / 2 / w, (r.y1 + r.y2) / 2 / h
        bw, bh = (r.x2 - r.x1) / w, (r.y2 - r.y1) / h
        lines.append(f"{CLASSES.index(r[2])} {xc:.6f} {yc:.6f} {bw:.6f} {bh:.6f}")   # r[2] = class 열
    # 그림과 같은 이름(stem)의 .txt 에 한 줄에 물체 하나씩 쓴다
    (root / "labels" / part / (Path(name).stem + ".txt")).write_text("\n".join(lines) + "\n", encoding="utf-8")

# data.yaml: path 는 data 폴더에서 실행할 때의 상대 경로, train/val 은 path 아래의 그림 폴더
yaml = ["path: out_ch17_yolo", "train: images/train", "val: images/val", "names:"]
yaml += [f"  {k}: {c}" for k, c in enumerate(CLASSES)]
(root / "data.yaml").write_text("\n".join(yaml) + "\n", encoding="utf-8")

for kind in ("images", "labels"):
    for part in ("train", "val"):
        print(f"{kind}/{part}: {len(list((root / kind / part).iterdir()))}개")
print("--- data.yaml")
print((root / "data.yaml").read_text(encoding="utf-8"), end="")
print("--- labels/train 의 첫 파일:", sorted((root / "labels" / "train").iterdir())[0].name)
print(sorted((root / "labels" / "train").iterdir())[0].read_text(encoding="utf-8"), end="")images/train: 45개
images/val: 11개
labels/train: 45개
labels/val: 11개
--- data.yaml
path: out_ch17_yolo
train: images/train
val: images/val
names:
0: bolt
1: nut
2: washer
--- labels/train 의 첫 파일: part_002.txt
1 0.506250 0.481250 0.112500 0.170833
1 0.740625 0.752083 0.131250 0.170833
0 0.709375 0.220833 0.162500 0.441667
1 0.162500 0.868750 0.100000 0.129167
1 0.323437 0.287500 0.128125 0.1750004단계. 라벨을 그림에 그려 확인하기
def draw_labels(img_path, label_path):
    """YOLO 라벨을 읽어 그림에 상자와 이름을 그린 RGB 그림을 돌려준다."""
    img = cv2.imread(str(img_path))
    h, w = img.shape[:2]
    colors = [(0, 0, 255), (0, 200, 255), (255, 200, 0)]   # BGR: bolt 빨강, nut 노랑, washer 하늘
    for line in label_path.read_text(encoding="utf-8").split("\n"):
        if not line.strip():
            continue
        cls, xc, yc, bw, bh = line.split()
        cls, xc, yc, bw, bh = int(cls), float(xc), float(yc), float(bw), float(bh)
        # 비율 → 픽셀로 되돌린다
        x1, y1 = round((xc - bw / 2) * w), round((yc - bh / 2) * h)
        x2, y2 = round((xc + bw / 2) * w), round((yc + bh / 2) * h)
        cv2.rectangle(img, (x1, y1), (x2, y2), colors[cls], 2)
        cv2.putText(img, CLASSES[cls], (x1, max(y1 - 4, 12)), cv2.FONT_HERSHEY_SIMPLEX, 0.45, colors[cls], 1)
    return cv2.cvtColor(img, cv2.COLOR_BGR2RGB)

val_images = sorted((root / "images" / "val").glob("*.png"))[:6]
fig, axes = plt.subplots(2, 3, figsize=(11, 5.6), layout="constrained")
for ax, p in zip(axes.ravel(), val_images):
    ax.imshow(draw_labels(p, root / "labels" / "val" / (p.stem + ".txt")))
    ax.set_title(p.name, fontsize=11)
    ax.axis("off")
fig.suptitle("검증용 그림 여섯 장에 YOLO 라벨을 되돌려 그린 결과")
plt.show()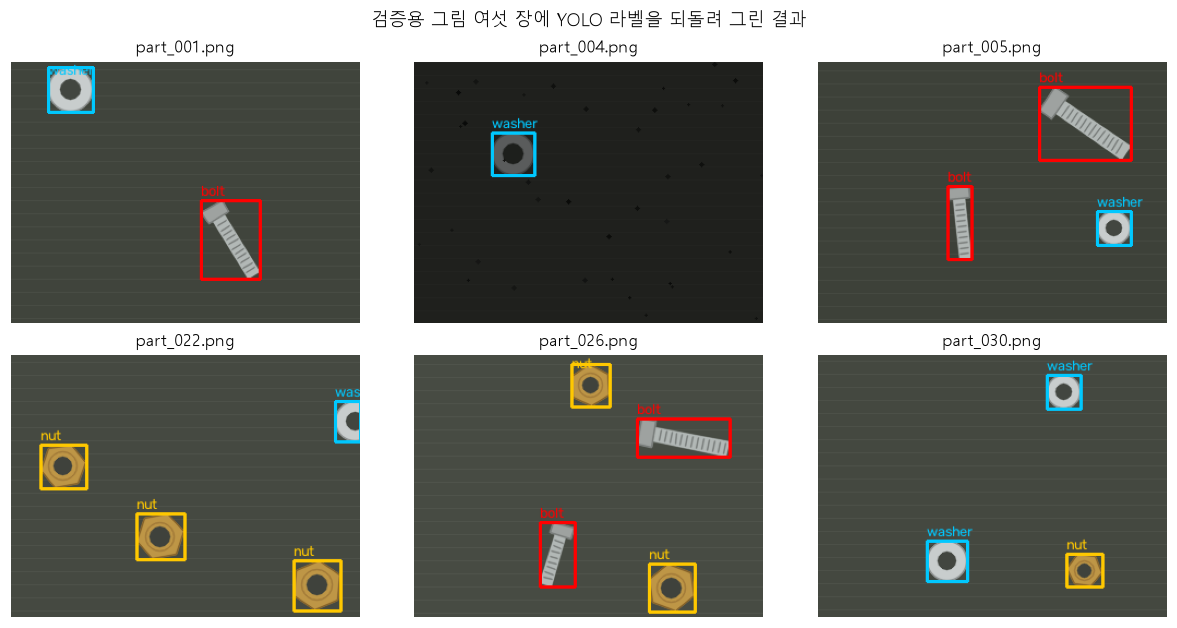
코드 설명
- 정리는 "프로그램이 고칠 것"과 "사람에게 돌려보낼 것"으로 나눴습니다. 뒤집힌 상자는
sorted로, 범위 밖은max(x1, 0),min(x2, w)로 고치고, 모르는 클래스나 주석 없는 그림은recheck에 모아 뺍니다. rng.permutation으로 그림 이름의 차례를 섞은 뒤 앞 80% 를 train, 나머지를 val 로 둡니다. 물체가 아니라 그림 단위로 나누므로 한 그림의 물체가 두 쪽에 갈라지지 않습니다.- 라벨 파일은 그림과 같은 stem 의
.txt로labels/train,labels/val에 씁니다.itertuples()에서 열 이름class는 파이썬 예약어라r[2]처럼 자리로 꺼냅니다. data.yaml은 글자로 직접 씁니다.path는 상대 경로라서, data 폴더에서 실행해야 맞는 자리를 가리킵니다.- 마지막 그림은 저장한 라벨을 다시 읽어 그린 것입니다. 숫자 검사를 통과했어도 이렇게 눈으로 한 번 더 봅니다.