19장. Vision 데이터 파이프라인
실습 2 — 다듬기 함수와 단계 잇기
실습 1이 남긴 통과 목록을 읽어 다듬기 단계를 붙입니다. 크기를 320×240 으로 맞추고, 어두운 그림은 감마로, 잡음이 많은 그림은 가우시안 블러로 고칩니다. 수집부터 다듬기까지 단계마다 남은 그림 수를 깔때기 표로 만들고, 손질한 그림의 전후를 격자로 봅니다. 실습 1을 먼저 실행해야 합니다.
1단계. 통과 목록 읽기
from pathlib import Path
import cv2
import numpy as np
import pandas as pd
import matplotlib.pyplot as plt

plt.rcParams["font.family"] = "Malgun Gothic"
plt.rcParams["axes.unicode_minus"] = False

if not Path("out_ch19_passed.csv").exists():
    raise SystemExit("out_ch19_passed.csv 가 없습니다. 실습 1을 먼저 실행하세요")

CONFIG = {
    "size": [320, 240],      # 맞출 가로, 세로(18차시 학습 크기)
    "dark_fix": 50,          # 평균 밝기가 이보다 작으면 감마로 밝힌다
    "gamma": 0.7,            # 감마 값(1 보다 작으면 어두운 쪽을 많이 올린다)
    "noise_max": 3.0,        # 잡음 점수가 이보다 크면 블러를 건다
    "denoise_ksize": 5,      # 가우시안 블러 창 크기
}

passed = pd.read_csv("out_ch19_passed.csv")
items = []
for row in passed.itertuples():
    # 실습 1에서 이미 열리는 것을 확인한 그림만 다시 읽는다
    items.append({"file": row.file, "source": row.source, "mean": row.mean, "img": cv2.imread(row.source)})
print("다듬을 그림:", len(items), "장")
print("크기 종류:", pd.Series([str(it["img"].shape) for it in items]).value_counts().to_dict())다듬을 그림: 18 장
크기 종류: {'(240, 320, 3)': 17, '(480, 640, 3)': 1}2단계. 다듬기 함수 만들기
def noise_score(img):
    """흑백과 3x3 미디언 블러의 차이 평균. 클수록 자글자글하다."""
    gray = cv2.cvtColor(img, cv2.COLOR_BGR2GRAY)
    return float(cv2.absdiff(gray, cv2.medianBlur(gray, 3)).mean())

def gamma_table(gamma):
    """5차시의 감마 조회표."""
    return np.array([((i / 255) ** gamma) * 255 for i in range(256)]).round().astype(np.uint8)

def prep_one(img, config):
    """그림 한 장을 다듬어 (새 그림, 줄인 비율, 손질 목록) 을 돌려준다. 원래 그림은 바꾸지 않는다."""
    notes = []
    w, h = config["size"]
    scale = w / img.shape[1]                            # 새 가로 ÷ 원래 가로
    if img.shape[:2] != (h, w):
        # INTER_AREA: 줄일 때 넓이 평균으로 계단 무늬를 줄인다(14차시)
        img = cv2.resize(img, (w, h), interpolation=cv2.INTER_AREA)
        notes.append(f"크기 {scale:g}배")
    mean = float(cv2.cvtColor(img, cv2.COLOR_BGR2GRAY).mean())
    if mean < config["dark_fix"]:
        img = cv2.LUT(img, gamma_table(config["gamma"]))   # LUT: 조회표로 모든 칸을 바꾼다
        notes.append(f"감마 {config['gamma']}")
    if noise_score(img) > config["noise_max"]:
        k = config["denoise_ksize"]
        img = cv2.GaussianBlur(img, (k, k), 0)          # 0: 퍼짐 정도를 창 크기에 맞춰 정한다(6차시)
        notes.append(f"블러 {k}x{k}")
    return img, scale, notes

# 손질이 필요한 세 장과 정상 한 장에 먼저 시험한다
for it in items:
    if it["file"] in ("belt_001.png", "belt_004.png", "belt_008.jpg", "belt_016.png"):
        new, scale, notes = prep_one(it["img"], CONFIG)
print(it["file"], it["img"].shape, "→", new.shape, "비율", scale, notes if notes else "손질 없음")belt_001.png (240, 320, 3) → (240, 320, 3) 비율 1.0 손질 없음
belt_004.png (240, 320, 3) → (240, 320, 3) 비율 1.0 ['감마 0.7']
belt_008.jpg (240, 320, 3) → (240, 320, 3) 비율 1.0 ['블러 5x5']
belt_016.png (480, 640, 3) → (240, 320, 3) 비율 0.5 ['크기 0.5배']3단계. 다듬기 단계와 깔때기 표
def prep_stage(items, config):
    """다듬기 단계: 모든 항목을 다듬어 새 항목 목록과 기록을 돌려준다."""
    out, log = [], []
    for it in items:
        new, scale, notes = prep_one(it["img"], config)
        out.append({**it, "img": new, "scale": scale, "notes": ", ".join(notes)})
        log.append({"file": it["file"], "stage": "다듬기", "result": "통과", "reason": ", ".join(notes)})
    return out, log

prepped, prep_log = prep_stage(items, CONFIG)

# 다듬은 그림을 저장한다: 실습 3이 이 폴더를 읽어 추론한다
out_dir = Path("out_ch19_prepped")
out_dir.mkdir(exist_ok=True)
for it in prepped:
    cv2.imwrite(str(out_dir / (Path(it["file"]).stem + ".png")), it["img"])   # 모두 png 로(값이 바뀌지 않게)
pd.DataFrame([{"file": it["file"], "saved": Path(it["file"]).stem + ".png", "scale": it["scale"], "notes": it["notes"]}
              for it in prepped]).to_csv("out_ch19_prepped.csv", index=False, encoding="utf-8-sig")

# 깔때기 표: 실습 1의 기록에서 단계마다 빠진 수를 센다
flog = pd.read_csv("out_ch19_filter_log.csv", keep_default_na=False)
gates = [("읽기", ("빈 파일", "깨짐", "너무 작음")), ("밝기", ("아주 어두움",)), ("흐림", ("흐림",)), ("중복", ("중복",))]
rows, left = [{"단계": "수집", "빠짐": 0, "남음": len(flog)}], len(flog)
for name, heads in gates:
    out = int(flog["reason"].str.startswith(heads).sum())   # 이유가 이 글자로 시작하는 줄 수
    left -= out
    rows.append({"단계": name, "빠짐": out, "남음": left})
rows.append({"단계": "다듬기", "빠짐": 0, "남음": len(prepped)})
funnel = pd.DataFrame(rows)
print(funnel.to_string(index=False))
print("손질한 그림:", {it["file"]: it["notes"] for it in prepped if it["notes"]})
print("다듬은 크기:", {it["img"].shape for it in prepped}) 단계 빠짐 남음
수집 0 24
읽기 2 22
밝기 1 21
흐림 1 20
중복 2 18
다듬기 0 18
손질한 그림: {'belt_004.png': '감마 0.7', 'belt_008.jpg': '블러 5x5', 'belt_016.png': '크기 0.5배'}
다듬은 크기: {(240, 320, 3)}4단계. 손질 전후를 격자로 보기
# 손질이 들어간 그림만 골라 위에는 원래 그림, 아래에는 다듬은 그림을 놓는다
changed = [(a, b) for a, b in zip(items, prepped) if b["notes"]]
fig, axes = plt.subplots(2, len(changed), figsize=(4 * len(changed), 6), layout="constrained")
for k, (a, b) in enumerate(changed):
    axes[0, k].imshow(cv2.cvtColor(a["img"], cv2.COLOR_BGR2RGB))
    axes[0, k].set_title(f"{a['file']} {a['img'].shape[1]}x{a['img'].shape[0]}")
    axes[1, k].imshow(cv2.cvtColor(b["img"], cv2.COLOR_BGR2RGB))
    axes[1, k].set_title(b["notes"])
for ax in axes.ravel():
    ax.axis("off")
plt.show()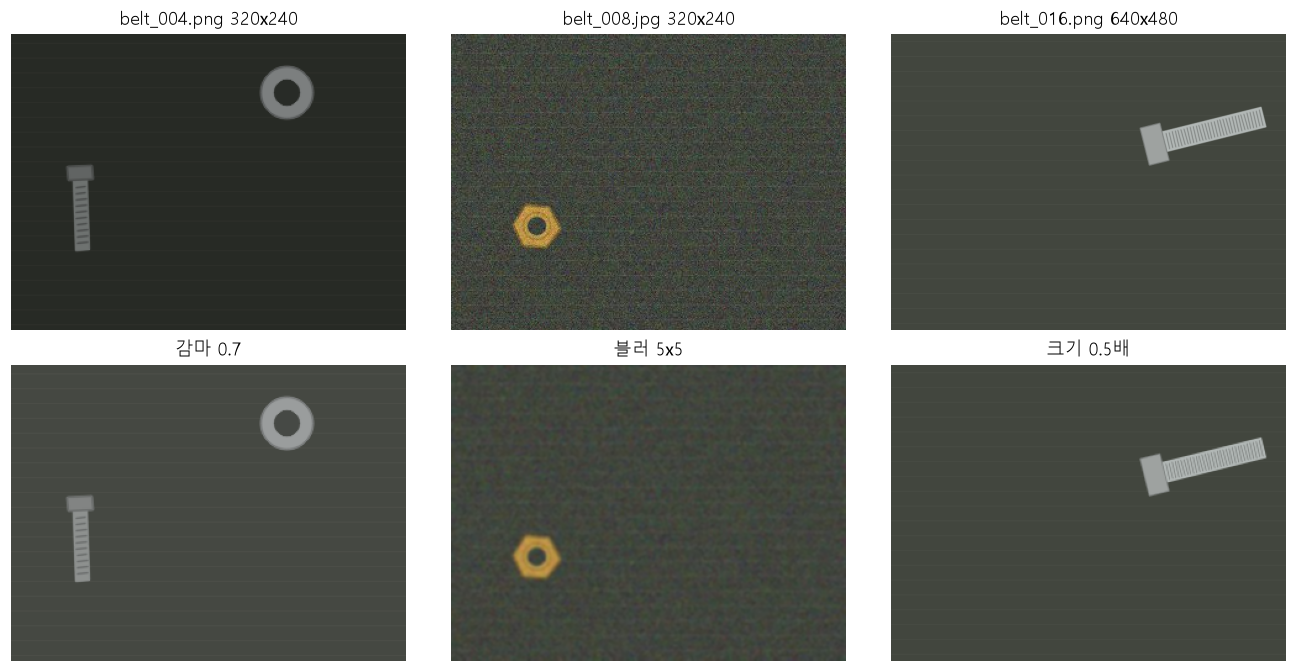
코드 설명
prep_one은 크기, 밝기, 잡음 순서로 판단해 필요한 손질만 겁니다. 크기를 먼저 맞추는 까닭은 밝기와 잡음 점수를 같은 크기에서 재기 위해서입니다. 잡음 점수는 그림을 줄이면 작아집니다.- 비율
scale은 새 가로 ÷ 원래 가로입니다. 640×480 그림은 0.5 이고, 실습 3에서 추론한 상자를 원래 좌표로 되돌릴 때 이 비율로 나눕니다. keep_default_na=False는 빈 칸을 NaN 대신 빈 글자""로 읽으라는 뜻입니다. 깔때기 표는 실습 1의 기록에서 "이유"의 첫 글자를 보고 단계별로 셉니다.str.startswith에 튜플을 주면 여러 글자 가운데 하나로 시작하면 참입니다. 24장에서 읽기 2, 밝기 1, 흐림 1, 중복 2장이 빠져 18장이 남았습니다.- 손질이 들어간 그림은
belt_004.png(감마 0.7),belt_008.jpg(블러 5x5),belt_016.png(크기 0.5배) 세 장뿐이고, 나머지 15장은 손질 없이 그대로 저장했습니다. 다듬은 18장은 모두 (240, 320, 3) 입니다.